Create a Family Group - Quick Start Guide
One of the key features at Family Recipe Central that separates us from other common recipe sites is the ability to create groups. A group brings people together online and enables them to collaborate on various projects. At Family Recipe Central, we're most interested in creating family groups that enable family members and relatives to collaborate online and create the family cookbook. To find out more about groups, see Groups - Overview. Then return here and follow this step-by-step quick start guide to create your family group.
OK, let's start at the top. Make sure you're logged in to your account. Just to make sure we're all on the same page, hit the "Home" button - top header menu.
The box at the top of the left hand sidebar is your account navigation. As long as you're logged in, your account navigation will always be in view, with your user name at the top. This provides an easy navigation anchor for you.
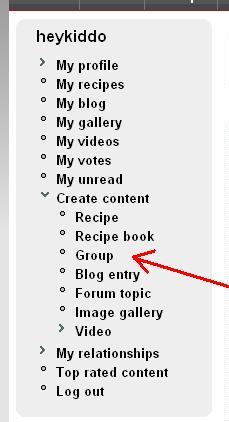
1. Click on the "Group" item under "Create content". This brings up a new create group form.
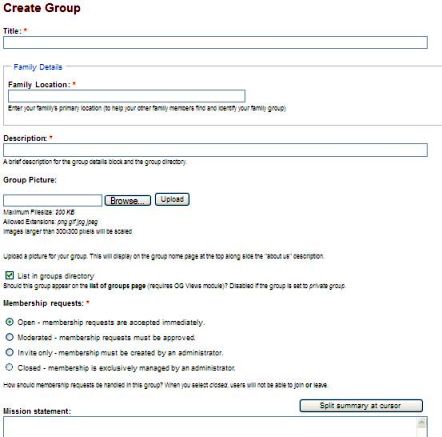
2. In the title field, key in the name of your family group. In this example, we're creating a family group for the user heykiddo. We'll name the family group heykiddo's family.
Note: All fields with a red asterisk after the field label are required fields. You have to provide something in a required field or you will receive an error when you try to save the form asking you to correct the missing field.
3. Key in your family location. This will display on your group home page next to your family description and family group picture. This helps other family members looking to join your group identify your family. Heykiddo lives in Kansas, so for the family location we'll say Hometown, KS.
4. Next, provide a brief one line family description. This description will appear in the public directory (if you choose the option to list your family group in the public directory). For heykiddo's family we'll say The Heykiddo family of Hometown Kansas
5. If you'd like to provide a picture for your family group home page, you can upload an image from the group picture field. The group picture will display on your group home page. This can be a family photo, a picture of your kitchen, or any image that you'd like to represent your family group.
An image on the group home page adds a nice touch. We support several graphic file formats. You can upload a GIF, JPG or PNG image. There's a size limit on the image files that you can upload. The maximum file size for the group picture is 200KB. This is roughly 300 x 300 pixels (width and height). If you have a larger or higher resolution image that you'd like to use, you'll need to edit the image and reduce to a smaller size first before you can upload to the site. You probably already have a suitable image editor on your computer already. If you have Microsoft Office on your Windows PC, "Microsoft Office Picture Manager" will work fine to re-size your images. On a Mac, use "iPhoto" to do the same.
Note: If you leave the group photo empty, a default family group image will be displayed. If you really prefer not to display a group or family photo, you can download a blank empty group image from the site and upload the blank image as your group photo to override the default image. See instructions from the group edit form.
7. Next, you want to set the membership request mode. Select one of the following four choices:
- Open - membership requests are accepted immediately and automatically. This is a little dangerous as this open option allows anyone to join your family group automatically. Most likely, you won't want to choose this mode.
- Moderated - membership requests must be approved. If you are the group administrator (you created the group), requests to join your group will come to you for approval. This is the most common membership mode, and allows you to moderate and control membership to your family group.
- Invite Only - membership must be created by an administrator. If you are the group administrator (you created the group), you will need to add the user as a member to your family group yourself. Users can send you a message or email and ask to join your group, but they can't initiate the "join request action" directly as they can in the "moderated" mode. In this mode, users can still leave a group themselves.
- Closed - membership is exclusively managed by the administrator. This is the tightest membership security, but puts the full burden of adding and removing members from the group on the group administrator. Probably a little extreme.
8. In the Mission Statement text box, put a welcome greeting for you family group. This will display as the "About Us" box next to your group picture on the group home page. Consider listing your family group objectives and mission. For heykiddo's family group, we'll put ... "Welcome to the Heykiddo family group. We're keeping track of the family recipes and plan on publishing a family cookbook for the holidays each year. All family members welcome."
9. For extra privacy, you can check the Private Group option. However, this setting is actually unnecessary since, by design, only members of a group can view and access that group's contents. Keep in mind that if the Private Group option is checked, the group administrator will need to add the members to the group manually by hand (Add Member link in the Group Navigation Box - see below ).
Also note that if the membership mode is set to Open, the Private Group option will be disabled.
10. Last, there is an option to include a checkbox to join the group on the site registration form. This is not a good idea since there are many family groups at Family Recipe Central, and most users registering at the site for an account will not be your family members. If you do check this option, the site administrator will deselect this setting. This option will be disabled in a future update.
11. Once you have all the settings filled in, hit the Save button at the bottom of the form to create your group. Be careful, if you navigate away from the page without saving your settings, you will lose all of your work. Be sure to Save!
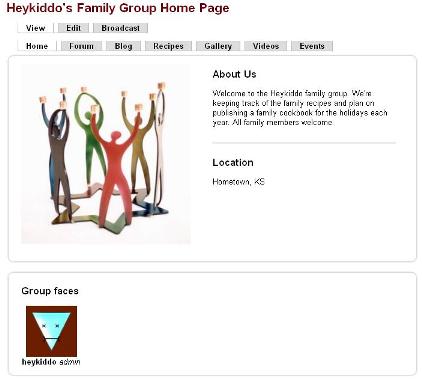
Once you save your group settings, you'll be taken to a view of your group home page. Your family group home page will look something like the Heykiddo Family Group home page as shown to the left.
 When you are logged in, the My groups navigation box in the right-hand sidebar will display a list of the groups where you're a member. When you click on one of the groups in the My groups navigation box, you'll be taken to that group's home page.
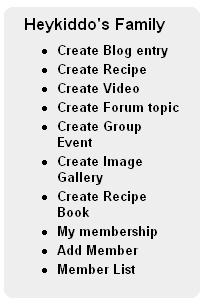
Once you have your group home page in view, you will find the group navigation box in the right-hand sidebar as shown with the group name as the title heading. The group navigation box provides a number of actions and functions you can perform within a group including creating a group blog entry, creating a group recipe, creating a group image gallery, and so forth.
As the group administrator, you'll see two extra functions at the bottom of the group navigation box. The Add member and Member list functions allow you to manage the membership (add, remove) members from your group. Standard group members (not administrators) do not see these two administrative functions.
As always, if you have any questions or feedback, be sure to share in the public forum section. You can access the forums from the top level menu under the page header. In the forum section, you'll find sections for support and training.
