Add a Recipe - Quick Start Guide
Add a Recipe - Quick Start Guide
One of the first things you'll want to learn how to do when join Family Recipe Central is how to add a new recipe. Here's a quick start guide that will get you going in no time. First, before you can enter your own recipes, you need to register for an account. See the "Signup Today" box in the top left hand corner. It's FREE, it's easy, and besides, you want to start plugging in your recipes don't you?
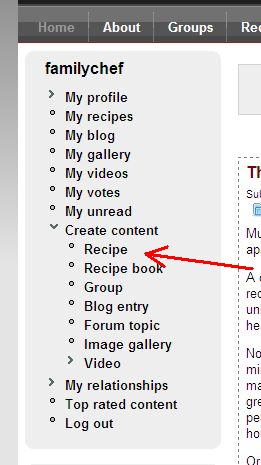
OK, let's start at the top. Make sure you're logged in to your account. Just to make sure we're all on the same page, hit the "Home" button - top header menu. The box at the top of the left hand sidebar is your account navigation. As long as you're logged in, your account navigation will always be in view, with your user name at the top. This provides an easy navigation anchor for you.
1. Click on the "Recipe" item under "Create content". This brings up a new add recipe form.
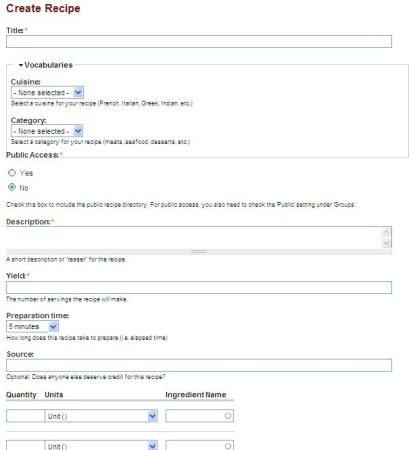
2. Key in a title for your recipe.
Note: All fields with a red asterisk after the field label are required fields. You have to provide something in a required field or you will receive an error when you try to save the form asking you to correct the missing field.
3. Vocabularies are useful tags that we use to categorize the content at Family Recipe Central, including recipe content. Select a cuisine from the "Cuisine" drop-down list. For example, is this an Italian or a French recipe.
4. Select a category from the "Category" drop-down list. For example, is this a meat dish, an omelette or a vegetable dish.
Note: You'll be able to search and filter your recipes by the "Cuisine" and "Category" terms.
5. Next, if you belong to any groups, you can select one or more groups that you'd like to have include the recipe. For this exercise, ignore setting any groups. We'll make this one of your personal recipes, only visible from your user profile (My profile).
6. You can set the "Public Access" option to "Yes" if you want to include your recipe in the "Public Recipe Directory". This means your recipe will show up when anyone views the site-level public recipes by hitting the "Recipes" button in the top level menu just under the header. For this exercise, we'll keep the recipe private, so keep the default set to "No". But don't keep of all your recipes to yourself. We'd love to have you share your recipes in our public directory.
7. In the Description box, provide a brief description of the recipe. Yes, this is a required field, so you need to come up with something. You'll be helping Family Recipe Central maintain great looking and consistently formatted recipes. Try something like, "This is one of my favorite chicken casserole dishes, and my kids actually love it. Easy to prepare in less than 30 minutes". OK, you've got the idea ...
8. In the "Yield" field, key in how many servings the recipe will make. This is a numeric value. So if the recipes makes 6 servings, just key in the number 6.
Note: By providing a yield value, anyone who views the recipe will be able to increase or decrease the yield and the ingredient quantities will automatically get recalculated. Pretty slick, don't you think?
9. From the "Preparation time" drop down list, select the best value that matches the duration or length of time it takes to prepare your recipe. You'll find values that range from 5 minutes to 48 hours (2+ days). If you need a preparation time outside of this range, submit a request in the "Support Forum" and we'll add some more time values to the list.
10. In the "Source" field, it's always a good idea to reference where you found a recipe if you've borrowed from another web site (always make sure you have permission to borrow or copy recipes). Another example, for a family recipe you might want to indicate that "Grandma Mary's favorite beef stew". Let's give credit where credit is due, right?
11. Next, enter the list of ingredients. The Item# column allows you to change the order of the items in the ingredient list. The item# 1 is first in the list, and the highest number item is at the end of the list. As you are keying in your ingredients, you don't need to pay much attention to the item#, just accept the default item number provided and tab over to the quantity field to enter the quantity. Later on, you can use the Item# column to reorder the items in the ingredients list if necessary.
Provide the quantity, then tab to the units column and select a "unit" of measure or volume from the drop down list such as "tbsp", "cup", or "pound". Then tab over to the ingredient name and key in the ingredient description such as "green onions, sliced".
In the "Units" drop down list, you can key in the letters of the unit or measure to quickly land on the unit your looking for. As an example, you can key in a "c" followed by a "u" in quick succession, and you'll jump straight to "cup" in the drop down list. Many ingredient entries do not need a "Units" value. The default "Unit" and "Each" terms in the drop down list will not actually display a units value. For example, if you enter "3 Unit chicken breasts", the actual display will be "3 chicken breasts" suppressing the "Unit" term. "Each" works the same way. If you enter "4 Each potatoes, cubed" the actual display will be "4 potatoes, cubed", suppressing the "Each" term.
The "Ingredient Name" field will expand in width automatically as you type in your description. If you pause after you type a few key strokes, this auto-complete field will pull similar entries from the database as you type, so you can let the system look-up similar ingredient descriptions. This can speed up the entry process. After many recipes have been entered in the system, it turns out that many ingredient descriptions are repetitive. How many times do you see "medium onion, diced" in a recipe?
By default, there are 10 rows for ingredients. If you need more rows for more ingredients, all you have to do is save the recipe by hitting the "save" button at the bottom of the form, then come back in by selecting the "edit" tab. You'll see another 10 empty rows for additional ingredients appended at the end of the first 10 ingredients you've already keyed in.
Note: This slightly clunky method of adding additional ingredient rows will be improved with an "add more rows" button in a future upgrade. That one is definitely on the To-Do list.
12. In the "Instructions" box, put the instructions and method for preparing the recipe. If you are copying the recipe from another document, cut-and-paste works fine in this block of text.
13. If you want to place some extra notes, use the "Additional Notes" box. A good way to use the "Additional Notes" entry is for variations or alternatives. For example, if you can recommend some helpful ingredient substitutions, or alternative preparation methods, put them in this area.
14. If you have a photo or image you would like to attach to the recipe, use the "Recipe Photo" upload tool. The system can accept "gif", "jpg", and "png" image files. Higher resolution images will be scaled down to 300x300 pixels, so try not to waste storage space by uploading unnecessarily large, high-resolution photos that will be crunched down anyway.
Once you have all the information properly entered, hit the "Save" button at the bottom of the form. Once you've saved your recipe you can view by hitting the "My recipes" link in the top left navigation box. You will also see a list of your recipes on your Profile home page.You can display your profile home page by hitting "My profile" from the top left navigation box.
If you have any questions or feedback, be sure to share in the Forum section. You can access the forums from the top level menu under the page header. In the forum section, you'll find sections for support and training.
